What do you do when you are given a blank white canvas? Paint of course! A blanket of fresh white snow is the perfect place to set your creativity juices free! With a few bottles of dyes/food coloring you can unleash your inner Pollock.
Wednesday, January 20, 2016
Snow Day Fun
Tuesday, October 6, 2015
Psalm 139:13-16
Lately I have been feeling a little bit of doubt. Am I doing what God is calling me to do? Am I doing it the right way? Am I fulfilling God's purpose for my life? Am I listening hard enough?
A recent search for a new daily devotional led me to this link. This really hit home for me even though it's a verse you hear often or that many already probably know. Sometimes it's just good to reflect on a oldie, but a goodie.
For you created my inmost being; you knit me together in my mother's womb. I praise you because I am fearfully and wonderfully made; your works are wonderful, I know that full well. My frame was not hidden from you when I was made in the secret place. When I was woven together in the depths of the earth, your eyes saw my unformed body. All the days ordained for me were written in your book before one of them came to be. Psalms 139:13-16
Sherry L. Meneley couldn't have said it better. "There is a seed in each of us, and God is our amazing botanist. He will nurture, water, fertilize and provide us all the sunshine we need to grow. But if I’m a bulb, and not an acorn, I need not attempt to change the thing God made me, my blueprint. I need to be a humble seed and allow the Botanist to germinate me into the wonderful thing He wants me to be. I need not envy all the other flowers, grasses and trees in the field, for I am special – so special – in exactly who God wants me to be."
Sometimes I will use a word in the verse as a literal piece of imagery in my Journaling Bible. It helps me reflect and memorize the passage."When I was "woven"..." So, for my first Take heART Journaling Bible tutorial I will show you how to create your very own woven piece. Here are the steps you can follow and if you have instagram you can share by #wovenpsalm139.
Supplies:
Bible (or paper)
Exacto or box cutter
Colorful Paper Strips (ribbons could work too :))
Glue stick
Ruler
A few easy to follow steps, it just takes a little patience!
First- find the page in your Journaling Bible. The margin has tiny faint lines down the edge of the page. Lay a piece of cardboard or chip board under the page you will be cutting. Cut each line using exacto knife, but be delicate. Continue all the way down. I used a ruler to keep my lines straighter and cut on each line (you can do every other)- I am a perfectionist.
Second- if you haven't prepared strips yet you will do so. A paper cutting tool works great, you can draw lines on paper and cut with scissors or you can do what I did I sent mine thru a one way paper shredder. ( I didn't get a picture in the daylight of the paper strip prettiness.)
Third- start weaving one strip at a time. Under, over, under, over- blah, blah, blah.
Fourth - trim if wanted or leave as a tab, then glue end pieces at top and bottom of page.
A recent search for a new daily devotional led me to this link. This really hit home for me even though it's a verse you hear often or that many already probably know. Sometimes it's just good to reflect on a oldie, but a goodie.
For you created my inmost being; you knit me together in my mother's womb. I praise you because I am fearfully and wonderfully made; your works are wonderful, I know that full well. My frame was not hidden from you when I was made in the secret place. When I was woven together in the depths of the earth, your eyes saw my unformed body. All the days ordained for me were written in your book before one of them came to be. Psalms 139:13-16
Sherry L. Meneley couldn't have said it better. "There is a seed in each of us, and God is our amazing botanist. He will nurture, water, fertilize and provide us all the sunshine we need to grow. But if I’m a bulb, and not an acorn, I need not attempt to change the thing God made me, my blueprint. I need to be a humble seed and allow the Botanist to germinate me into the wonderful thing He wants me to be. I need not envy all the other flowers, grasses and trees in the field, for I am special – so special – in exactly who God wants me to be."
Sometimes I will use a word in the verse as a literal piece of imagery in my Journaling Bible. It helps me reflect and memorize the passage."When I was "woven"..." So, for my first Take heART Journaling Bible tutorial I will show you how to create your very own woven piece. Here are the steps you can follow and if you have instagram you can share by #wovenpsalm139.
Supplies:
Bible (or paper)
Exacto or box cutter
Colorful Paper Strips (ribbons could work too :))
Glue stick
Ruler
A few easy to follow steps, it just takes a little patience!
First- find the page in your Journaling Bible. The margin has tiny faint lines down the edge of the page. Lay a piece of cardboard or chip board under the page you will be cutting. Cut each line using exacto knife, but be delicate. Continue all the way down. I used a ruler to keep my lines straighter and cut on each line (you can do every other)- I am a perfectionist.
Second- if you haven't prepared strips yet you will do so. A paper cutting tool works great, you can draw lines on paper and cut with scissors or you can do what I did I sent mine thru a one way paper shredder. ( I didn't get a picture in the daylight of the paper strip prettiness.)
Third- start weaving one strip at a time. Under, over, under, over- blah, blah, blah.
Fourth - trim if wanted or leave as a tab, then glue end pieces at top and bottom of page.
My Top 5 Favorite Journaling Bible Supplies
So... I try not to go overboard on buying art supplies for my Journaling Bible- keep it simple and easy to carry. You don't have to have all the fancy schmancy schtuff to make masterpieces in your Journaling Bible. (Although I do love to splurge every now and then.)
All you need are the basics- pen, pencil, paint and brush. Really you could manage with just pencils and a pen, but why not throw in something you might not have (that is inexpensive.)
Let's get more specific:
1.) Micron pens- they come in different sizes and colors, but one will do ya. These are handy to have because they don't bleed through your pages. Sharpies will bleed right thru so it's your choice if you decide to go with a sharpie. Don't say I didn't warn ya.
2.) Twistable Crayola colored pencils- these come in various pack sizes and you will want to make sure to grab the colored pencil ones and not the crayons, if you want to be able to create better detail. These are great to have when you don't have a pencil sharpener.
3.) Artist Loft watercolors. These come from Michael's. I think I bought mine for under 3 bucks with a coupon! Since they are inexpensive, why not add a set of pearlescent paints! They are GORGEOUS and sparkle. I love sparkles!
4.) Prismacolors are the most expensive on the top 5 list. They run about $20 a set of 12, They ARE worth every penny if you love coloring. The colors are much more vibrant than any other colored pencil out there. Well maybe not the only one, but very close! I have a few that belonged to my dad when he was in college. They last quite a while. You can use a coupon on these too and get much cheaper. (I always use a coupon so I can buy more!)
5.) Last but not least a watercolor brush! I ordered mine from Amazon. Pentel brand, I think. These are the bomb diggity! Did I just type that? You fill the barrel up with water and take it where ever you want to paint. BOOM! No spillage of the murky water.
So that, in a nutshell, is a list of my go to's, my faves. I will post some extra's I suggest later. Hope this helps!
All you need are the basics- pen, pencil, paint and brush. Really you could manage with just pencils and a pen, but why not throw in something you might not have (that is inexpensive.)
Let's get more specific:
1.) Micron pens- they come in different sizes and colors, but one will do ya. These are handy to have because they don't bleed through your pages. Sharpies will bleed right thru so it's your choice if you decide to go with a sharpie. Don't say I didn't warn ya.
2.) Twistable Crayola colored pencils- these come in various pack sizes and you will want to make sure to grab the colored pencil ones and not the crayons, if you want to be able to create better detail. These are great to have when you don't have a pencil sharpener.
3.) Artist Loft watercolors. These come from Michael's. I think I bought mine for under 3 bucks with a coupon! Since they are inexpensive, why not add a set of pearlescent paints! They are GORGEOUS and sparkle. I love sparkles!
4.) Prismacolors are the most expensive on the top 5 list. They run about $20 a set of 12, They ARE worth every penny if you love coloring. The colors are much more vibrant than any other colored pencil out there. Well maybe not the only one, but very close! I have a few that belonged to my dad when he was in college. They last quite a while. You can use a coupon on these too and get much cheaper. (I always use a coupon so I can buy more!)
5.) Last but not least a watercolor brush! I ordered mine from Amazon. Pentel brand, I think. These are the bomb diggity! Did I just type that? You fill the barrel up with water and take it where ever you want to paint. BOOM! No spillage of the murky water.
So that, in a nutshell, is a list of my go to's, my faves. I will post some extra's I suggest later. Hope this helps!
Sunday, March 29, 2015
Hervé Tullet- children's book author and illustrator
Have you ever walked through the children's book section and there's a book that's just asking for you to pick it up? One that grabs your attention because it just looks cool? I don't know about you, but the phrase "don't judge a book by it's cover," doesn't apply to children's books?
Great books welcome entertaining art lessons for every age. When we got home from the library we read the book and then got out our do-a-dots stampers to create our book of press here dots. Many supplies work well with this interactive game book. Try some circle stickers, circle shaped foam brushes, eraser stamps, thumbprints, q-tips and more!
Our love for Press Here led me to do some research on the author/illustrator, and low and behold, there are over 50 fabulous books that Hervé Tullet has created! He really has a knack for getting the readers participation. Each one is just as good or better than the next! Hervé Tullet is one of the most creative and whimsical children's book author/illustrator! Check out the following books at your local library or buy a copy to add to your collection! (They are totally worth having your own copy!)
- The Book with a Hole
- The Game of Light
- Mix it Up
- The Game of Sculpture
- The Game in the Dark
- I am Blop
- The Big Book of Art
- The Scribble Book
Check out Hervé Tullet's other amazing books here.
Do you have a favorite?
Tuesday, March 24, 2015
A Tisket, A Tasket: Not Your Ordinary Kids Easter Basket!
Baskets can be so much fun to fill! Around our house they are more than just a chocolate two ton hollow bunny, pastel sugary stuff and dollar tree toys (whoops, meant junk) that takes up space. We leave the baskets of sugar to the grandparents. I try to pick items that are useful or find ways we can make memories together. Typically we make most of our memories making arts/crafts.
Looking for something other than "regular" art supplies for your kiddo(s) as a gift? Here are 15 great products that I love!
- Ikea Tidny Fabric- white fabric with fun black shapes, color with Stained by Sharpie
- Stained by Sharpie- Great for coloring fabrics!
- Doodle Cook encourages young artists to experiment with line variety by adding a dash of squiggles, a pinch of zigzags and a few sprinkles of some dots and dashes. Doodle Cook is a whimsical coloring prompt book that will keep your kiddos busy for hours. Best suited for 4 and up.
- Splat Art has over 200 blops that invite kids to use their imaginations and turn them into something other than just a splatter.
- Playcolor Metallic Stick Paint- these are so much fun and can be a quick art project with a little mess. Playcolor sticks are tempera paint inside a tube that can be applied directly to paper, posterboard or wood. Since they are water soluble you can add water if you would like. Great for small hands.
- Crayola Air Dry Clay- This clay has the feel of professional grade highwater clay, they are affordable and are useful when teaching about slip and scoring.
- Do-A-Dot Markers- These stampers are fun for all ages but great for preschoolers! They come in many different colors.
- Crayola Twistable Colored Pencils- We take these with us wherever we go, they are perfect for doodling/coloring and you don't even need a pencil sharpener. Just twist!
- Crayola Sidewalk Chalk- You may say why should I buy Crayola brand sidewalk chalk, well... Because they have bright vivid colors that I haven't seen in any other brands. It's worth a little extra $ to have fun colors to use on the pavement.
- Crayola Oil Pastels- I really have no particular preference on oil pastels, they seem to all work equally the same.
- Faber Castell Gel Sticks- (similar to the Playcolor Metallic Stick paints) They glide on smooth and have little clean up. Best suited for 5 and up.
- Crayola Paintbrushes- Often children are given the super cheap paintbrushes that are horribly difficult to paint with, spend a little more and get quality brushes. Synthetic brushes are durable and last as long as you wash after each use.
- Caran d'Ache Classic Neocolor II Water-Soluble Pastels- Crayon like coloring can turn into beautiful watercolor paintings with a little bit of water. These are fun to use as facepaint or for coloring designs on your body.
- Sargent Art Watercolor Magic Set - Can you tell I am a fan of watercolor paints? Liquid watercolor paints will last you forever, where as the cake watercolors disappear in a couple of uses when kids are just learning to use watercolors. Just a small squirt of paint along with a little water will stretch this paint out! Use straight from bottle or add water.
- Colorations Bleeding Tissue Paper- Cover your work surface and take a white cardstock and spray with water. Place pieces of bleeding tissue paper on top and what the magic once you lift them off!
What are you filling your child(ren)'s basket with this year?
Monday, March 23, 2015
A Tisket, A Tasket: Not Your Ordinary Teen Easter Basket!
Have your tweens/teens outgrown their cutesy basket you filled with cheap toys and candy last year? Well... If you are having a hard time figuring out what to fill their basket with this go round, here are a few of my favorite go to items that are fun for any art enthusiast! Think outside the box and forget the JUNK! These baskets aren't just for Easter, they are perfect for Birthday's and Just Because Gifts.
Unique Sketchbooks/Drawing Journals/Prompts- great for doodlers
Skywriting
Wreck this Journal
Book of Fidgets- Look Inside
Walls Notebook
Enchanted Forest Coloring Book- Coloring is for all ages!
Mixed Media Inspiration Deck
Skywriting
Wreck this Journal
Book of Fidgets- Look Inside
Walls Notebook
Enchanted Forest Coloring Book- Coloring is for all ages!
Mixed Media Inspiration Deck
Just add water
Inktense Pencils
Dr. Ph. Martin's Radiant Concentrated Watercolor Dyes
Staedtler Karat Watercolor Pencils
Graphite Aquarelle
Waterbrushes
Inktense Pencils
Dr. Ph. Martin's Radiant Concentrated Watercolor Dyes
Staedtler Karat Watercolor Pencils
Graphite Aquarelle
Waterbrushes
Not just your Ordinary Pencils
Woodless Graphite Pencils
Prismacolor Pencils
Caran d'Ache Pablo Colored Pencils
Woodless Graphite Pencils
Prismacolor Pencils
Caran d'Ache Pablo Colored Pencils
Wooden Man
This may seem like a very silly gift, but mannequins are great for teens/students that have a love for drawing figures. They help to learn proportions and movement. You can pose them any way you wish.
These are professional grade items that cost a little more- don't let the price pass these up, just use a coupon to cut costs.
SAVE SOME $$$ USE YOUR CRAFT STORE COUPONS!
Wednesday, March 18, 2015
31 Days of Children's Books Inspired by Artists- DAY 18: Kandinsky
Estimated time: 30-45 minutes
Project: Kandinsky felt board
About the artist: (1866-1944) Wassily Kandinsky was born in Moscow, Russia. At an early age, he exhibited a very special gift called synaesthesia cognate. It gave him the ability to hear colors and see sounds. His father encouraged this special ability and enrolled him in piano,cello and art lessons. He studied law and economics. After he got a job at the University of Moscow he shortly decided that art was what he wanted pursue.
Summary: Read The Noisy Paint Box, then study Kandinsky's work. Follow this lesson to make a felt board inspired by Wassily Kandinsky. Maybe try playing music in the background while you make your felt board.
Objectives: Identify the elements of art (line, shape, form, space, value, texture and color), Understand and apply media, techniques, and processes, Understand the visual arts in relation to history and cultures.
Supplies:
- Felt
- Scissors
What shapes do you see? Do they overlap? Are the repeated? Do you see complementary colors (colors across from one another on color wheel- Red and Green, Blue and Orange, Yellow and Purple)
- Gather felt scraps and sheets. Set a whole sheet aside for the back.
- When cutting you can draw the shape on the back side with a sharpie, but we didn't find it necessary as the more rough the edges are the more the felt looks like paint.
- Continue cutting until you have plenty of shapes so you can make many different combinations.We made some donut shapes by folding the oval in half and cutting a smaller oval inside.
- Arrange any way you would like!
- Voila! A Kandinsky inspired felt board.
Labels:
31,
Art History,
Children's Book,
Fine Art,
Kandinsky,
March Masters
Monday, March 16, 2015
31 Days of Children's Books Inspired by Artists- DAY 16: Pippin
Estimated time: 30-45 minutes
Project: Sidewalk chalk drawing, we drew one of the pages
About the artist:(1888-1946) Pippin loved to draw as a child. He loved drawing pictures and giving them to friends and family as gifts. During WWI Pippin drew from the trenches. He got shot while he was away at war, which made it very difficult for him to use his art to draw/paint. He was persistent and determined and regained that movement.
Summary: Read Splash of Red, then study Pippin's work. Follow this lesson on sidewalk chalk drawing inspired by Horace Pippin. Pippin loved charcoals. Charcoals would make a lovely drawing as well.
Objectives: Identify the elements of art (line, shape, form, space, value, texture and color), Understand and apply media, techniques, and processes, Understand the visual arts in relation to history and cultures.
Supplies:
- Sidewalk
- Chalk
- Paper
- Charcoals
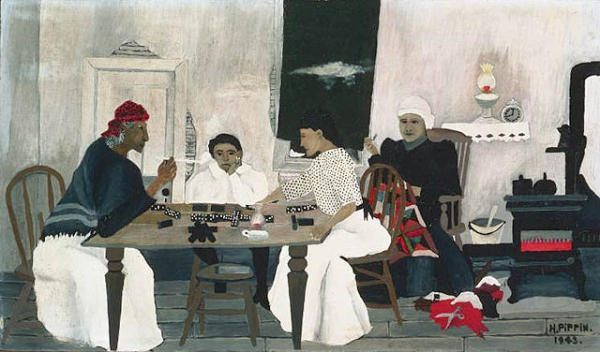
Domino Players: 1943, Country Doctor (Night Call): 1935
Do you have a family game night? Pippin played with his family. What do you see in the Domino Players? Was the night call an easy trip? How was the weather?
Horace Pippin Sidewalk Chalk Art:
- We chose a picture from Splash of Red. Look closely at the illustration and draw what you see.
- Easy peasy!
Labels:
Art History,
Children's Book,
Fine Art,
March Masters,
Pippin
Saturday, March 14, 2015
31 Days of Children's Books Inspired by Artists- DAY 14: Thiebaud
Title: Counting with Wayne Thiebaud
Estimated time: 30-45 minutes
Project: Thiebaud Pie Boxes
About the artist:(1920-)Wayne Thiebaud, whose name is pronounced TEE-BOW is an artist in the 31 days of Children's book inspired by artists that is still living! He is commonly considered a pop artist because his paintings are similar to the pop culture subject matter. He began painting this style before Pop Art became popular, so his pastries could have been and inspiration to some artists during the pop art movement.
Summary: Read Counting with Wayne Thiebaud, then study his work. Follow this lesson on Pie Boxes inspired by Thiebaud. Print more than one and make a whole pie. Talk about fractions.
Objectives: Identify the elements of art (line, shape, form, space, value, texture and color), Understand and apply media, techniques, and processes, Understand the visual arts in relation to history and cultures.
Supplies:
Estimated time: 30-45 minutes
Project: Thiebaud Pie Boxes
About the artist:(1920-)Wayne Thiebaud, whose name is pronounced TEE-BOW is an artist in the 31 days of Children's book inspired by artists that is still living! He is commonly considered a pop artist because his paintings are similar to the pop culture subject matter. He began painting this style before Pop Art became popular, so his pastries could have been and inspiration to some artists during the pop art movement.
Summary: Read Counting with Wayne Thiebaud, then study his work. Follow this lesson on Pie Boxes inspired by Thiebaud. Print more than one and make a whole pie. Talk about fractions.
Objectives: Identify the elements of art (line, shape, form, space, value, texture and color), Understand and apply media, techniques, and processes, Understand the visual arts in relation to history and cultures.
Supplies:
- Printable pie and cake file
- Cardstock
- Scissors
- Glue or tape
- Sprinkles-glitter, seed beads
- Frosting- Glitter glue or puff paint
- Paint or markers
- Cotton balls
- Paint brush
Boston Creme: 1962, Cakes: 1963
What are similar about these two paintings? Are colors spread throughout the composition? Is there repetition?
Let's make a pie in honor of Pi Day! 3.141592
Instructions for Pie:
- Print pie template.
- Color or paint. Let dry. The top is the triangle without the scalloped edge crust.
- Carefully cut around outside edges and then you can use an exacto to cut slits in dotted lines.
- Fold box on solid lines and glue or tape the sides labeled glue or tape.
- Fold the tabs labeled "a" on outside of pie and slip into the slits on the box, this will allow you to put something inside.
- Now you can decorate with sprinkles and frosting. Fluff cotton ball and glue on top for whipped cream.
- Voila! A pie or cake to share with a friend.
- Print cake template.
- Color or paint. Let dry.
- Carefully cut around outside edges.
- Fold box on solid lines and glue or tape the sides labeled glue or tape.
- DO NOT glue or tape the short tab labeled DO NOT GLUE if you want box to open and close.
- Now you can decorate with sprinkles and frosting. Fluff cotton ball and glue on top for whipped cream.
- Voila! A pie or cake to share with a friend.
How many pie/cake slices does it take to make a whole pie with these boxes?
These images are suitable for
children, please be aware when doing a search for artists you may find
imagery that is not age appropriate.
Labels:
31,
Art History,
Children's Book,
Fine Art,
March Masters,
Thiebaud
Friday, March 13, 2015
31 Days of Children's Books Inspired by Artists- DAY 13: Calder
Title: Sandy's Circus
Estimated time: 45 minutes- 1 hour
Project: Calders Charm Bracelet
About the artist: (1889-1976) Alexander Calder was born in Pennsylvania. His dad was a sculpture and his mom was a portrait painter. His parents encouraged him to choose a career in visual arts. He took their advice and decided to study mechanical engineering, but he still loved art. After graduating he decided to go off to art school where he worked a lot with kinetic sculpture. He is know for his mobiles.
Summary: Read Sandy's Circus, then study his work. Follow this lesson on creating a charm bracelet inspired by Calder. Compare organic and geometric shapes. How many shapes can you make?
Objectives: Identify the elements of art (line, shape, form, space, value, texture and color), Understand and apply media, techniques, and processes, Understand the visual arts in relation to history and cultures.
Supplies:
Estimated time: 45 minutes- 1 hour
Project: Calders Charm Bracelet
About the artist: (1889-1976) Alexander Calder was born in Pennsylvania. His dad was a sculpture and his mom was a portrait painter. His parents encouraged him to choose a career in visual arts. He took their advice and decided to study mechanical engineering, but he still loved art. After graduating he decided to go off to art school where he worked a lot with kinetic sculpture. He is know for his mobiles.
Summary: Read Sandy's Circus, then study his work. Follow this lesson on creating a charm bracelet inspired by Calder. Compare organic and geometric shapes. How many shapes can you make?
Objectives: Identify the elements of art (line, shape, form, space, value, texture and color), Understand and apply media, techniques, and processes, Understand the visual arts in relation to history and cultures.
Supplies:
- Foam sheets
- Scissors
- Jump Rings
- Beads
- String
Labels:
31,
Art History,
Calder,
Children's Book,
Fine Art,
March Masters
Thursday, March 12, 2015
31 Days of Children's Books Inspired by Artists- DAY 12: Matisse
Title: Henri's Scissors
Estimated time: 35-45 minutes
Project: Matisse Pop Up Card
About the artist:(1869-1954) Matisse was born in France. As a young man he traveled to Paris to study law. After he moved back home and found a job in a law office as a clerk he had to have surgery due to appendicitis. While he was bed ridden his mom gave him paints. While painting he was brought to realization that he wanted to be an artist, so he went back to school. The school he attended was very strict about what style the students painted, which Matisse hated. Around that time Impressionism was becoming popular. Matisse tried it and never fully embraced the style. A group of his friends were frustrated with the Academy rules and began experimenting with color. These artists are known as the fauves. A French word meaning "wild beast." they painted with a vibrant palette. In the 40's Henri's health went down hill and it made it hard for him to paint. Instead, he cut shapes from paper- collages. This is known by him as "drawing with scissors" and "cut outs."
Summary: Read Henri's Scissors, then study his work. Follow this lesson on creating a textured jungle animal collage to create a pop up card inspired by Matisse. Compare organic and geometric shapes. Talk about overlapping shapes, foreground, middle ground, background.
Objectives: Identify the elements of art (line, shape, form, space, value, texture and color), Understand and apply media, techniques, and processes, Understand the visual arts in relation to history and cultures.
Supplies:
Matisse Pop Up Card:
Estimated time: 35-45 minutes
Project: Matisse Pop Up Card
About the artist:(1869-1954) Matisse was born in France. As a young man he traveled to Paris to study law. After he moved back home and found a job in a law office as a clerk he had to have surgery due to appendicitis. While he was bed ridden his mom gave him paints. While painting he was brought to realization that he wanted to be an artist, so he went back to school. The school he attended was very strict about what style the students painted, which Matisse hated. Around that time Impressionism was becoming popular. Matisse tried it and never fully embraced the style. A group of his friends were frustrated with the Academy rules and began experimenting with color. These artists are known as the fauves. A French word meaning "wild beast." they painted with a vibrant palette. In the 40's Henri's health went down hill and it made it hard for him to paint. Instead, he cut shapes from paper- collages. This is known by him as "drawing with scissors" and "cut outs."
Summary: Read Henri's Scissors, then study his work. Follow this lesson on creating a textured jungle animal collage to create a pop up card inspired by Matisse. Compare organic and geometric shapes. Talk about overlapping shapes, foreground, middle ground, background.
Objectives: Identify the elements of art (line, shape, form, space, value, texture and color), Understand and apply media, techniques, and processes, Understand the visual arts in relation to history and cultures.
Supplies:
- Cardstock or construction paper
- Scissors
- Pencil
- Glue
- Ruler
Do you so any repetitive shapes? Can you spot the complementary colors? Henri started painting and then when he was unable to paint he cut paper, what was this period called?
- Fold a full sheet of construction paper/cardstock in half.
- Draw parallel lines on the folded side, these will become the "pop ups." I drew an x on the back for the pieces I wanted to push in. These should not be much more than inch wide. These can be various sizes. This will give the dimension.
- Carefully cut slits on the lines you created, half way to the other edge is plenty far enough.
- Open the card and push the cut pieces with an x on them and carefully fold back in half. This is your base.
- Now comes the fun part! Making color "Cut Outs" to place on the card and pop up bars. You can draw shapes before you cut if that helps you with your design.
- Glue rectangles and shapes on the background and the flap that sits on the table.
- Cut organic shapes and swirls to attach to the pop up bar.
- Voila! A pop up card inspired by Henri Matisse!
What colors of paper are you going to cut? What shapes are you going to make? Can you cut a swirl?
These images are suitable for
children, please be aware when doing a search for artists you may find
imagery that is not age appropriate.
Labels:
31,
Art History,
Children's Book,
March Masters,
Matisse
Wednesday, March 11, 2015
31 Days of Children's Books Inspired by Artists- DAY 11: Rousseau
Estimated time: 45 minutes-1 hour
Project: Textured Tissue Paper Collage
About the artist:(1844-1910) Henri Rousseau was a French Artist that didn't begin painting until he was 40. Take a step into this book and learn how his persistence paid off.
Summary: Read The Fantastic Jungles of Henri Rousseau, then study his work. Follow this lesson on creating a textured jungle animal collage inspired by Rousseau. Talk about overlapping shapes, foreground, middle ground, background.
Objectives: Identify the elements of art (line, shape, form, space, value, texture and color), Understand and apply media, techniques, and processes, Understand the visual arts in relation to history and cultures.
Textured Jungle supplies:
- Elmer's Glue mixed with water
- Colorful Tissue paper
- Old Paintbrush
- Heavy posterboard or cardstock
- Scissors
Tiger in Tropical Storm:1891, Rabbit: 1908
How does the tiger in a tropical storm make you feel? How can you tell that the painting is of a storm? What movement do you see in the painting? Does the second painting show movement? What do you see in the Rabbit?Textured Tissue Paper Jungle Animal:
- Lightly sketch/draw your animal of choice. We are using a mandrill, but Rousseau did many other animals.
- Here are the steps on how to draw Mandrill.
- After you have drawn Mandrill you can start tearing tissue paper into small pieces. Think of all the ways you can make it look different. Roll it like a worm, twist it, ball it up, scrunch it.
- Apply a layer of glue to the area you want to work on first. Press your tissue paper onto the glue.
- Continue pressing tissue paper onto you piece until you have covered most of the space.
- Voila! A Textured tissue paper jungle animal inspired by Henri Rousseau.
These images are suitable for
children, please be aware when doing a search for artists you may find
imagery that is not age appropriate.
Labels:
31,
Art History,
Children's Book,
Fine Art,
March Masters,
Rousseau
Tuesday, March 10, 2015
31 Days of Children's Books Inspired by Artists- DAY 10: Hunter
Title: Art From Her Heart
Estimated time: 45 minutes-1 hour
Project: Hunter Painting
About the artist:(1886-1988) Clementine Hunter (pronounced Clementeen) was a self taught African American folk artist, her grandmother was a slave. She lived in Louisiana on Melrose Plantation were she was a farm laborer. She never learned to read or write. Hunter didn't start painting until she was in her 50's, she sold her paintings for .25.
Summary: Read Art from the Heart, then study Hunter's work. Follow this lesson on making a painting inspired by Clementine Hunter.
Objectives: Identify the elements of art (line, shape, form, space, value, texture and color), Understand and apply media, techniques, and processes, Understand the visual arts in relation to history and cultures.
Painting Supplies:
Estimated time: 45 minutes-1 hour
Project: Hunter Painting
About the artist:(1886-1988) Clementine Hunter (pronounced Clementeen) was a self taught African American folk artist, her grandmother was a slave. She lived in Louisiana on Melrose Plantation were she was a farm laborer. She never learned to read or write. Hunter didn't start painting until she was in her 50's, she sold her paintings for .25.
Summary: Read Art from the Heart, then study Hunter's work. Follow this lesson on making a painting inspired by Clementine Hunter.
Objectives: Identify the elements of art (line, shape, form, space, value, texture and color), Understand and apply media, techniques, and processes, Understand the visual arts in relation to history and cultures.
Painting Supplies:
- Pacon Poster Boards (PAC5417)
or Darice 8-Inch-by-10-Inch Stretched Canvas, 2-Pack
- Plaid PROMOABI Apple Barrel Acrylic Paint, 2-Ounce, Best Selling Colors I
- Crayola 5ct Art and Craft Brush Set
- Cup for water
Call to Church and Flowers, Cotton Pickers, Zinnias in a Pot
Did Clementine paint what she knew? What do the paintings say about her life? Do they depict a time in history? Are they realistic? What colors does she use?
Clementine Hunter Painting:
- Think of a scene in your everyday life or flowers. Lightly sketch your idea on your board or canvas.
- Start with the background first, that's the area around your figures or subject.
- Painting from background to foreground helps you paint layers.
- Voila! A Painting inspired by Clementine Hunter.
These images are suitable for
children, please be aware when doing a search for artists you may find
imagery that is not age appropriate.
Labels:
31,
Art History,
Children's Book,
Fine Art,
Hunter,
March Masters
Subscribe to:
Posts (Atom)